> ## Documentation Index
> Fetch the complete documentation index at: https://auth0-cq3uo.mintlify.site/llms.txt
> Use this file to discover all available pages before exploring further.
# iOS / macOS
##### By Rita Zerrizuela
This guide demonstrates how to integrate Auth0 with any new or existing iOS / macOS app using the Auth0.swift SDK.We recommend that you log in to follow this quickstart with examples configured for your account.
## Configure Auth0
You will need a **Native** Auth0 application. If you don’t have a Native Auth0 application already, [create one](/docs/get-started/auth0-overview/create-applications/native-apps) before continuing. Avoid using other application types, as they have different configurations and may cause errors.
### Configure the callback and logout URLs
The callback and logout URLs are the URLs that Auth0 invokes to redirect back to your app. Auth0 invokes the callback URL after authenticating the user, and the logout URL after removing the session cookie.
If the callback and logout URLs are not set, users will be unable to log in and out of the app and will get an error.
On iOS 17.4+ and macOS 14.4+ it is possible to use Universal Links as callback and logout URLs. When enabled, Auth0.swift will fall back to using a custom URL scheme on older iOS / macOS versions.
Whenever possible, Auth0 recommends using Universal Links as a secure way to link directly to content within your app. Custom URL schemes can be subject to [client impersonation attacks](https://datatracker.ietf.org/doc/html/rfc8252#section-8.6).
**This feature requires Xcode 15.3+ and a paid Apple Developer account**.
Go to the [settings page](https://manage.auth0.com/#/applications/\{yourClientId}/settings) of your Auth0 application and add the following URLs to **Allowed Callback URLs** and **Allowed Logout URLs**, depending on the platform of your app. If you have a [custom domain](/docs/customize/custom-domains), use this instead of the value from the settings page.
#### iOS
```
https://{yourDomain}/ios/YOUR_BUNDLE_IDENTIFIER/callback,
YOUR_BUNDLE_IDENTIFIER://{yourDomain}/ios/YOUR_BUNDLE_IDENTIFIER/callback
```
#### macOS
```
https://{yourDomain}/macos/YOUR_BUNDLE_IDENTIFIER/callback,
YOUR_BUNDLE_IDENTIFIER://{yourDomain}/macos/YOUR_BUNDLE_IDENTIFIER/callback
```
For example, if your iOS bundle identifier were `com.example.MyApp` and your Auth0 domain were `example.us.auth0.com`, then this value would be:
```
https://example.us.auth0.com/ios/com.example.MyApp/callback,
com.example.MyApp://example.us.auth0.com/ios/com.example.MyApp/callback
```
### Configure the associated domain
This step requires a paid Apple Developer account. It is needed to use Universal Links as callback and logout URLs. Skip this step to use a custom URL scheme instead.
#### Configure the Team ID and bundle identifier
Scroll to the end of the settings page of your Auth0 application and open **Advanced Settings > Device Settings**. In the **iOS** section, set **Team ID** to your [Apple Team ID](https://developer.apple.com/help/account/manage-your-team/locate-your-team-id/), and **App ID** to your app's bundle identifier.
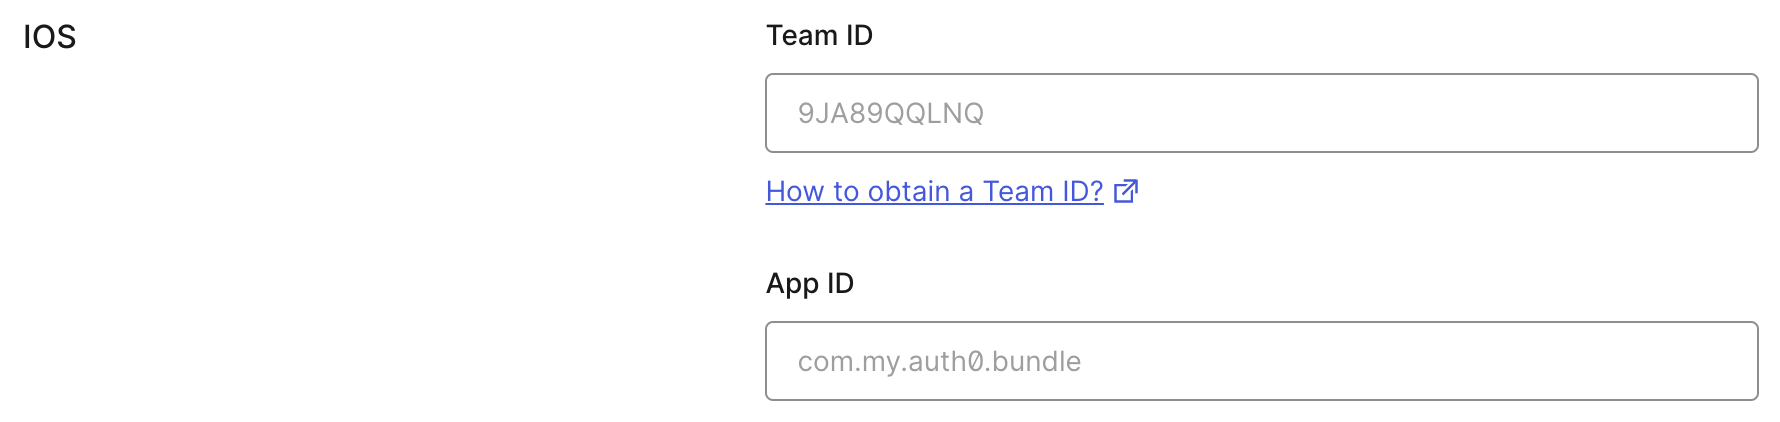
This will add your app to your Auth0 tenant's `apple-app-site-association` file.
#### Add the associated domain capability
In Xcode, go to the **Signing and Capabilities** [tab](https://developer.apple.com/documentation/xcode/adding-capabilities-to-your-app#Add-a-capability) of your app's target settings, and press the **+ Capability** button. Then select **Associated Domains**.
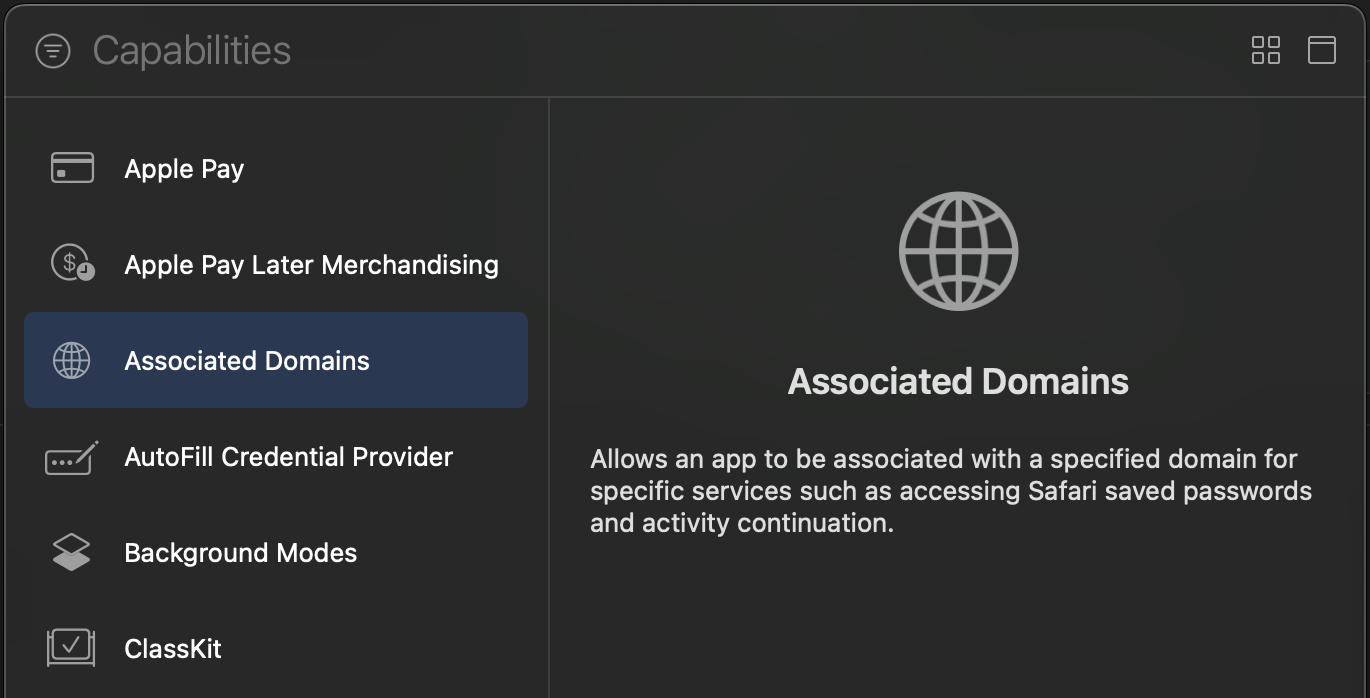
Next, add the following [entry](https://developer.apple.com/documentation/xcode/configuring-an-associated-domain#Define-a-service-and-its-associated-domain) under **Associated Domains**:
```
webcredentials:{yourDomain}
```
If you have a [custom domain](/docs/customize/custom-domains), use this instead of the Auth0 domain from the settings page.
For the associated domain to work, your app must be signed with your team certificate **even when building for the iOS simulator**. Make sure you are using the Apple Team whose Team ID is configured in the settings page of your Auth0 application.
## Install the SDK
Add the [Auth0.swift](https://github.com/auth0/Auth0.swift) SDK to your project. The library will make requests to the Auth0 Authentication and Management APIs.
### Using the Swift Package Manager
Open the following menu item in Xcode:
**File > Add Package Dependencies...**
In the **Search or Enter Package URL** search box enter this URL:
```
https://github.com/auth0/Auth0.swift
```
Then, select the dependency rule and press **Add Package**..
For further reference on SPM, check its [official documentation](https://developer.apple.com/documentation/xcode/adding-package-dependencies-to-your-app).
### Using Cocoapods
Add the following line to your `Podfile`:
```
pod 'Auth0', '~> 2.0'
```
Then, run `pod install`.
For further reference on Cocoapods, check their [official documentation](https://guides.cocoapods.org/using/getting-started.html).
### Using Carthage
Add the following line to your `Cartfile`:
```
github "auth0/Auth0.swift" ~> 2.0
```
Then, run `carthage bootstrap --use-xcframeworks`.
For further reference on Carthage, check their [official documentation](https://github.com/Carthage/Carthage#getting-started).
## Configure the SDK
The Auth0.swift SDK needs the **Client ID** and **domain** of the Auth0 application to communicate with Auth0. You can find these details in the [settings page](https://manage.auth0.com/#/applications/\{yourClientId}/settings) of your Auth0 application. If you are using a [custom domain](/docs/customize/custom-domains), use the value of your custom domain instead of the value from the settings page.
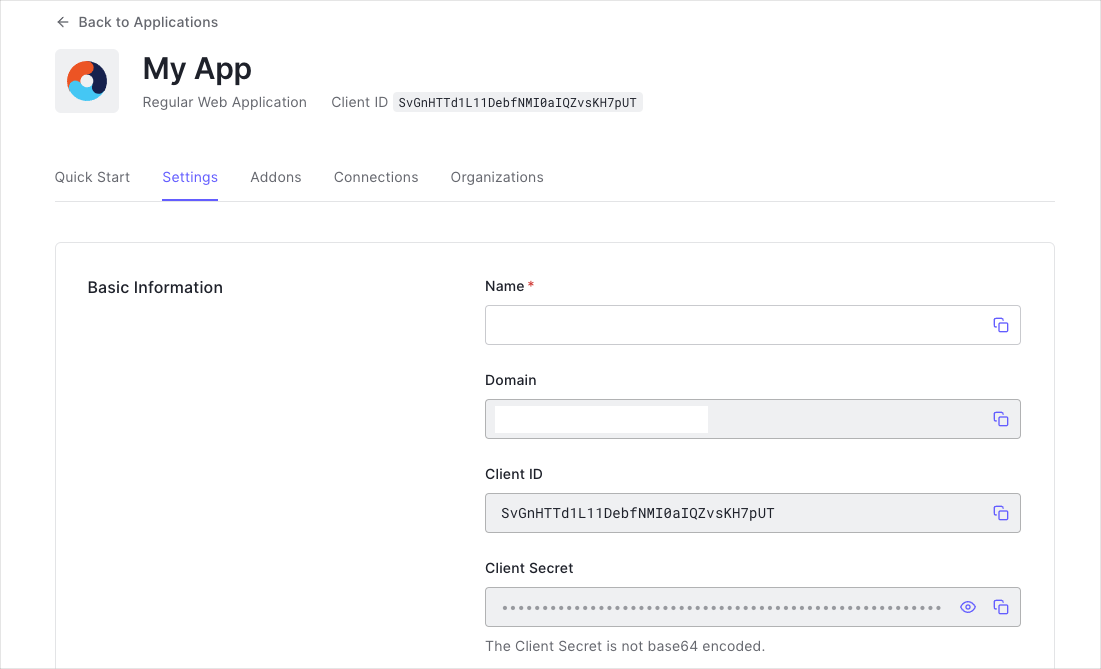
Create a `plist` file named `Auth0.plist` in your app bundle with the following content:
```xml lines theme={null}
ClientId
{yourClientId}
Domain
{yourDomain}
```
If you download the sample from the top of this page, these details are filled out for you.
You can also configure the SDK programmatically. Check the [README](https://github.com/auth0/Auth0.swift#configure-client-id-and-domain-programmatically) to learn more.
### Checkpoint
Now that you have configured Auth0.swift with the Client ID and domain, run your app to verify that it is not producing any errors related to the SDK.
## Login
Import the `Auth0` module in the file where you want to present the login page.
```swift lines theme={null}
import Auth0
```
Then, present the [Universal Login](/docs/authenticate/login/auth0-universal-login) page in the action of your **Login** button.
```swift lines theme={null}
Auth0
.webAuth()
.useHTTPS() // Use a Universal Link callback URL on iOS 17.4+ / macOS 14.4+
.start { result in
switch result {
case .success(let credentials):
print("Obtained credentials: \(credentials)")
case .failure(let error):
print("Failed with: \(error)")
}
}
```
You can use async/await or Combine instead of the callback-based API. Check the [README](https://github.com/auth0/Auth0.swift#web-auth-login-ios--macos) to learn more.
### Checkpoint
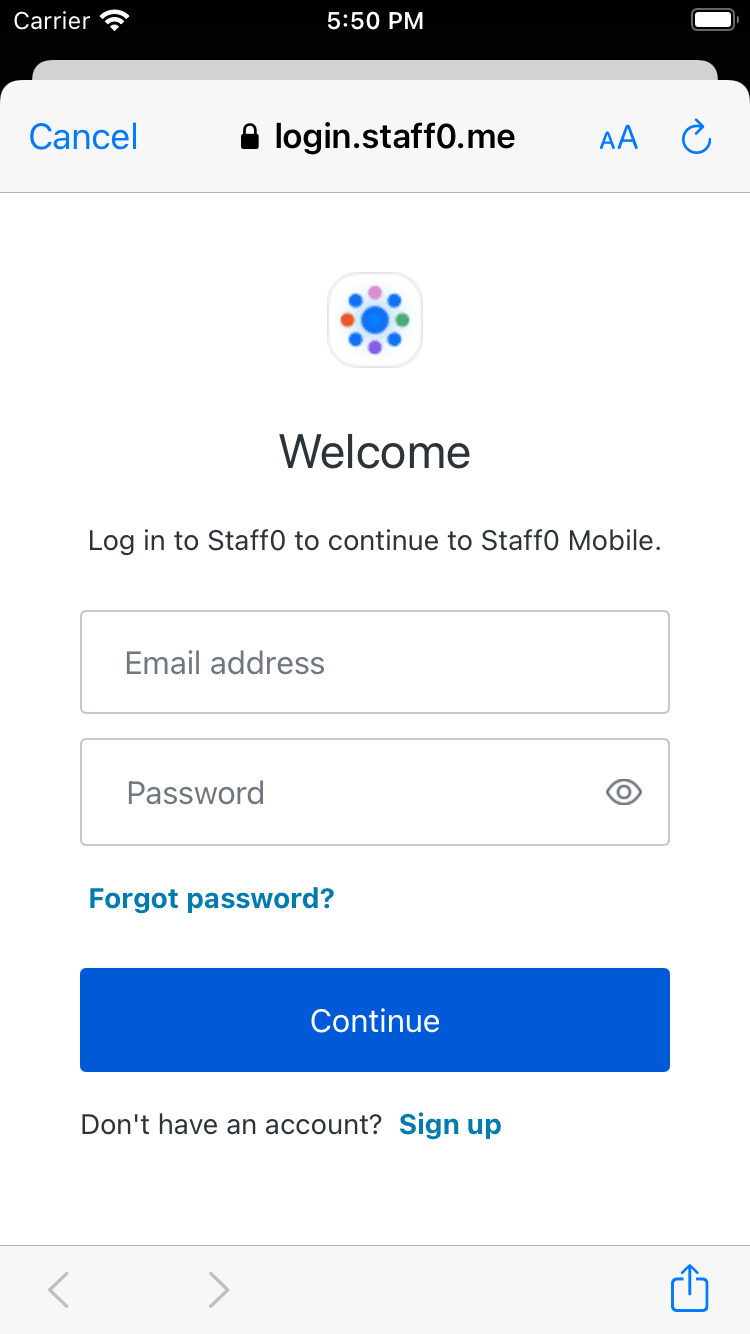
Verify that pressing the **Login** button shows an [alert box](https://github.com/auth0/Auth0.swift#sso-alert-box-ios--macos) asking for consent and that choosing **Continue** opens the Universal Login page in a Safari modal. Verify that you can log in or sign up using a username and password or a social provider.
Once that is complete, verify that the Safari modal closes automatically.
## Logout
Now that you can log in to your app, you need a way to [log out](/docs/authenticate/login/logout). In the action of your **Logout** button, call the `clearSession()` method to clear the Universal Login session cookie.
```swift lines theme={null}
Auth0
.webAuth()
.useHTTPS() // Use a Universal Link logout URL on iOS 17.4+ / macOS 14.4+
.clearSession { result in
switch result {
case .success:
print("Logged out")
case .failure(let error):
print("Failed with: \(error)")
}
}
```
### Checkpoint
Verify that pressing the **Logout** button shows an alert box asking for consent and that choosing **Continue** opens a page in a Safari modal. Verify that the Safari modal closes automatically soon after.
## Access User Profile Information
The `Credentials` instance you obtained after logging in includes an [ID Token](/docs/secure/tokens/id-tokens). The ID Token contains the profile information associated with the logged-in user, such as their email and profile picture. You can use these details to personalize the user interface of your app.
The Auth0.swift SDK includes a [utility](https://github.com/auth0/JWTDecode.swift) for decoding [JWTs](https://jwt.io/) like the ID Token. Start by importing the `JWTDecode` module in the file where you want to access the user profile information.
```swift lines theme={null}
import JWTDecode
```
Then, use the `decode(jwt:)` method to decode the ID Token and access the claims it contains.
```swift lines theme={null}
guard let jwt = try? decode(jwt: credentials.idToken),
let name = jwt["name"].string,
let picture = jwt["picture"].string else { return }
print("Name: \(name)")
print("Picture URL: \(picture)")
```
You can retrieve the latest user information with the `userInfo(withAccessToken:)` method. Check the [EXAMPLES](https://github.com/auth0/Auth0.swift/blob/master/EXAMPLES.md#retrieve-user-information) to learn more.
### Checkpoint
Verify that you can access the `email`, `picture`, or any other [claim](/docs/secure/tokens/id-tokens/id-token-structure) after you have logged in.
## What's Next?
Check the SDK documentation to learn how to perform some common tasks, explore more advanced use cases, and discover all the available features:
* [Next steps](https://github.com/auth0/Auth0.swift#next-steps)
* [API documentation](https://auth0.github.io/Auth0.swift/)
* [FAQ](https://github.com/auth0/Auth0.swift/blob/master/FAQ.md)
[Edit on GitHub](https://github.com/auth0/docs/edit/master/articles/quickstart/native/ios-swift/01-login.md)