> ## Documentation Index
> Fetch the complete documentation index at: https://auth0-cq3uo.mintlify.site/llms.txt
> Use this file to discover all available pages before exploring further.
# React: Login
##### By Dan Arias
Auth0 allows you to add authentication to your React application quickly and to gain access to user profile information. This guide demonstrates how to integrate Auth0 with any new or existing React application using the Auth0 React SDK.We recommend that you log in to follow this quickstart with examples configured for your account.
Visit the [React Authentication By Example](https://developer.auth0.com/resources/guides/spa/react/basic-authentication) guide for a deep dive into implementing user authentication in React. This guide provides additional details on how to create a sign-up button and add route guards using React Router.
**New to Auth?** Learn [How Auth0 works](/docs/overview), how it [integrates with Single-Page Applications](/docs/architecture-scenarios/application/spa-api) and which [protocol](/docs/flows/concepts/auth-code-pkce) it uses.
## Configure Auth0
### Get Your Application Keys
When you signed up for Auth0, a new application was created for you, or you could have created a new one. You will need some details about that application to communicate with Auth0. You can get these details from the [Application Settings](https://manage.auth0.com/#/applications) section in the Auth0 dashboard.
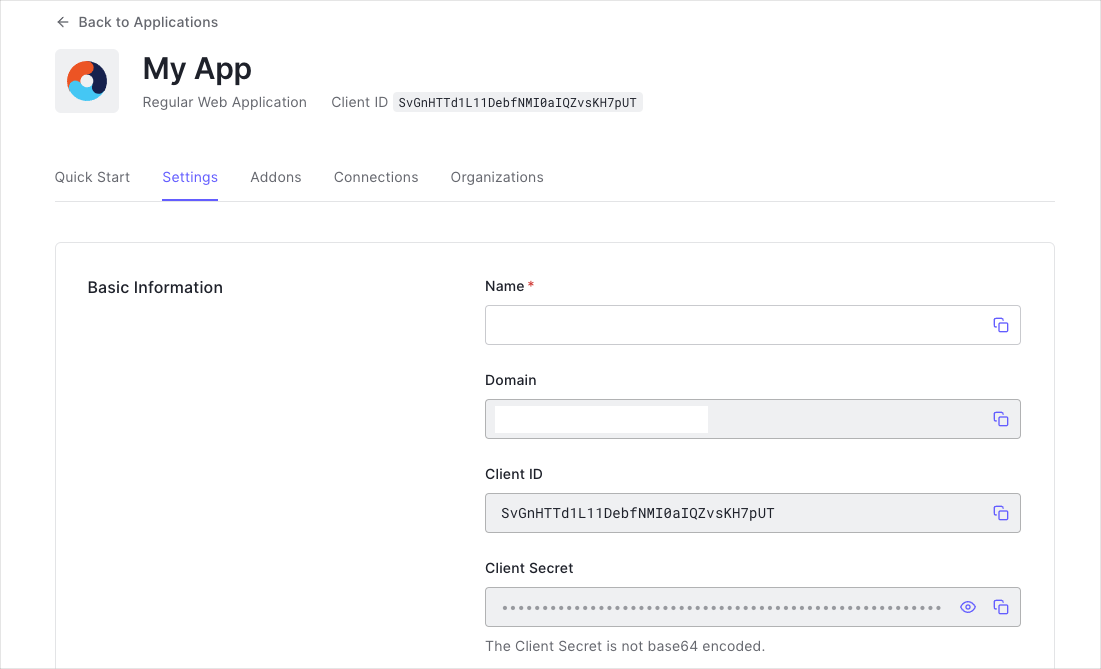
When using the Default App with a Native or Single Page Application, ensure to update the **Token Endpoint Authentication Method** to `None` and set the **Application Type** to either `SPA` or `Native`.
You need the following information:
* **Domain**
* **Client ID**
If you download the sample from the top of this page, these details are filled out for you.
### Configure Callback URLs
A callback URL is a URL in your application where Auth0 redirects the user after they have authenticated. The callback URL for your app must be added to the **Allowed Callback URLs** field in your [Application Settings](https://manage.auth0.com/#/applications). If this field is not set, users will be unable to log in to the application and will get an error.
If you are following along with the sample project you downloaded from the top of this page, you should set the **Allowed Callback URL** to `http://localhost:3000`.
### Configure Logout URLs
A logout URL is a URL in your application that Auth0 can return to after the user has been logged out of the authorization server. This is specified in the `returnTo` query parameter. The logout URL for your app must be added to the **Allowed Logout URLs** field in your [Application Settings](https://manage.auth0.com/#/applications). If this field is not set, users will be unable to log out from the application and will get an error.
If you are following along with the sample project you downloaded from the top of this page, the logout URL you need to add to the **Allowed Logout URLs** field is `http://localhost:3000`.
### Configure Allowed Web Origins
You need to add the URL for your app to the **Allowed Web Origins** field in your [Application Settings](https://manage.auth0.com/#/applications/\{yourClientId}/settings). If you don't register your application URL here, the application will be unable to silently refresh the authentication tokens and your users will be logged out the next time they visit the application, or refresh the page.
If you are following along with the sample project you downloaded from the top of this page, you should set the **Allowed Web Origins** to `http://localhost:3000`.
## Install the Auth0 React SDK
Run the following command within your project directory to install the Auth0 React SDK:
```bash lines theme={null}
npm install @auth0/auth0-react
```
The SDK exposes methods and variables that help you integrate Auth0 with your React application idiomatically using [React Hooks](https://react.dev/reference/react/hooks) or [Higher-Order Components](https://reactjs.org/docs/higher-order-components.html).
### Configure the Auth0Provider component
Under the hood, the Auth0 React SDK uses [React Context](https://react.dev/reference/react/useContext) to manage the authentication state of your users. One way to integrate Auth0 with your React app is to wrap your root component with an `Auth0Provider` that you can import from the SDK.
```js lines theme={null}
import React from 'react';
import { createRoot } from 'react-dom/client';
import { Auth0Provider } from '@auth0/auth0-react';
import App from './App';
const root = createRoot(document.getElementById('root'));
root.render(
,
);
```
The `Auth0Provider` component takes the following props:
* `domain` and `clientId`: The values of these properties correspond to the "Domain" and "Client ID" values present under the "Settings" of the single-page application that you registered with Auth0.
If you are using a [custom domain with Auth0](/docs/custom-domains), the value of the domain property is the value of your custom domain instead of the value reflected in the "Settings" tab.
* `authorizationParams.redirect_uri`: The URL to where you'd like to redirect your users after they authenticate with Auth0.
`Auth0Provider` stores the authentication state of your users and the state of the SDK — whether Auth0 is ready to use or not. It also exposes helper methods to log in and log out your users, which you can access using the `useAuth0()` hook.
### Checkpoint
Now that you have configured `Auth0Provider`, run your application to verify that the SDK is initializing correctly, and your application is not throwing any errors related to Auth0.
## Add Login to Your Application
The Auth0 React SDK gives you tools to quickly implement user authentication in your React application, such as creating a [login](https://auth0.com/docs/login) button using the `loginWithRedirect()` method from the `useAuth0()` hook. Executing `loginWithRedirect()` redirects your users to the Auth0 Universal Login Page, where Auth0 can authenticate them. Upon successful authentication, Auth0 will redirect your users back to your application.
```js lines theme={null}
import React from "react";
import { useAuth0 } from "@auth0/auth0-react";
const LoginButton = () => {
const { loginWithRedirect } = useAuth0();
return ;
};
export default LoginButton;
```
This guide focuses on using the `useAuth0()` custom React Hook. If you are using class components, check out [these samples using the `withAuth0()` higher-order component](https://github.com/auth0/auth0-react/blob/master/EXAMPLES.md#use-with-a-class-component).
### Checkpoint
Add the `LoginButton` component to your application. When you click it, verify that your React application redirects you to the [Auth0 Universal Login](https://auth0.com/universal-login) page and that you can now log in or sign up using a username and password or a social provider.
Once that's complete, verify that Auth0 redirects you to your application using the value of the `authorizationParams.redirect_uri` that you used to configure the `Auth0Provider`.
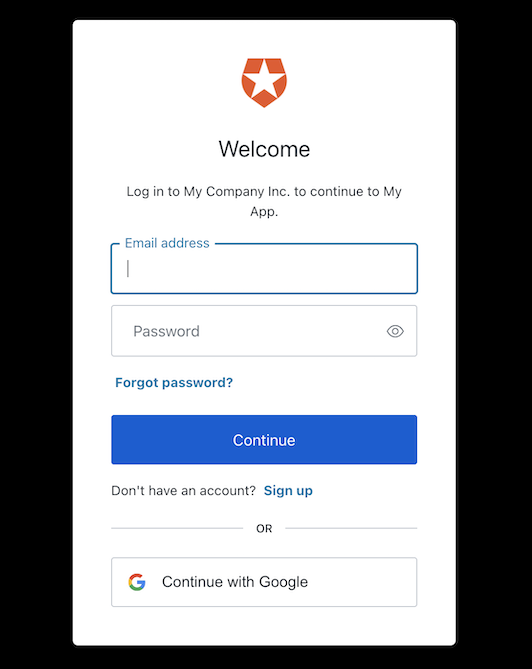
Auth0 enables the Google social provider by default on new tenants and offers you developer keys to test logging in with [social identity providers](/docs/connections/identity-providers-social). However, these developer keys have some limitations that may cause your application to behave differently. For more details on what this behavior may look like and how to fix it, consult the [Test Social Connections with Auth0 Developer Keys](/docs/connections/social/devkeys#limitations-of-developer-keys) document.
## Add Logout to Your Application
Now that you can log in to your React application, you need [a way to log out](https://auth0.com/docs/logout/guides/logout-auth0). You can create a logout button using the `logout()` method from the `useAuth0()` hook. Executing `logout()` redirects your users to your [Auth0 logout endpoint](https://auth0.com/docs/api/authentication?javascript#logout) (`https://YOUR_DOMAIN/v2/logout`) and then immediately redirects them to your application.
```js lines theme={null}
import React from "react";
import { useAuth0 } from "@auth0/auth0-react";
const LogoutButton = () => {
const { logout } = useAuth0();
return (
);
};
export default LogoutButton;
```
### Checkpoint
Add the `LogoutButton` component to your application. When you click it, verify that your React application redirects you the address you specified as one of the "Allowed Logout URLs" in the "Settings" and that you are no longer logged in to your application.
## Show User Profile Information
The Auth0 React SDK helps you retrieve the [profile information](https://auth0.com/docs/users/concepts/overview-user-profile) associated with logged-in users quickly in whatever component you need, such as their name or profile picture, to personalize the user interface. The profile information is available through the `user` property exposed by the `useAuth0()` hook. Take this `Profile` component as an example of how to use it:
```js lines theme={null}
import React from "react";
import { useAuth0 } from "@auth0/auth0-react";
const Profile = () => {
const { user, isAuthenticated, isLoading } = useAuth0();
if (isLoading) {
return
Loading ...
;
}
return (
isAuthenticated && (
{user.name}
{user.email}
)
);
};
export default Profile;
```
The `user` property contains sensitive information and artifacts related to the user's identity. As such, its availability depends on the user's authentication status. To prevent any render errors, use the `isAuthenticated` property from `useAuth0()` to check if Auth0 has authenticated the user before React renders any component that consumes the `user` property. Ensure that the SDK has completed loading before accessing the `isAuthenticated` property, by checking that `isLoading` is `false`.
### Checkpoint
Verify that you can display the `user.name` or [any other `user` property](https://auth0.com/docs/users/references/user-profile-structure#user-profile-attributes) within a component correctly after you have logged in.
##### What can you do next?