You can configure Auth0 to serve as an for GitHub Enterprise Cloud (github.com). GitHub requires an enterprise-level subscription to enable using an external IdP.Documentation Index
Fetch the complete documentation index at: https://auth0-cq3uo.mintlify.app/llms.txt
Use this file to discover all available pages before exploring further.
- To learn about on GitHub, read About authentication with SAML single sign-on on https://docs.github.com.
- To learn how to configure Auth0 as the identity provider for GitHub Enterprise Server (private instance), read Configure Auth0 as Identity Provider for GitHub Enterprise Server.
Configure SAML SSO on Auth0
- Go to Dashboard > Applications > Applications and create a new application. Give it a meaningful name like GitHub. You can choose any application type, but the Regular Web App type is recommended.
- Go to the Addons tab and enable the SAML2 Web App toggle.
-
On the Settings tab, set the Application Callback URL to:
https://github.com/orgs/{YOUR_GITHUB_ORG_NAME}/saml/consume.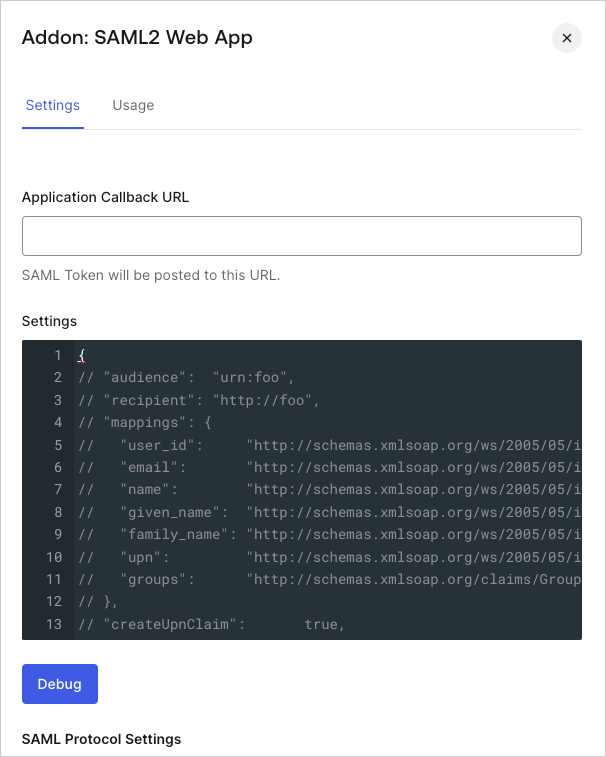
-
Paste the following code into the Settings text box and click Debug.
- Replace
{YOUR_GITHUB_ORG_NAME}with the GitHub organization name that corresponds to your subscription. The mapping will send theuser_idas the Name Identifier to GitHub. This is a good option if you enable more than one connection for the GitHub application, as it will ensure uniqueness (every user will have a different ID). - If you are using a single connection, you might want to use the
nicknameor another unique identifier as a friendlier Name Identifier (but make sure that the property you choose is unique). As an example, if you wantnicknameas the Name Identifier, themappingssection above will look like this:
- Replace
- Scroll to the bottom of the tab and click Enable.
-
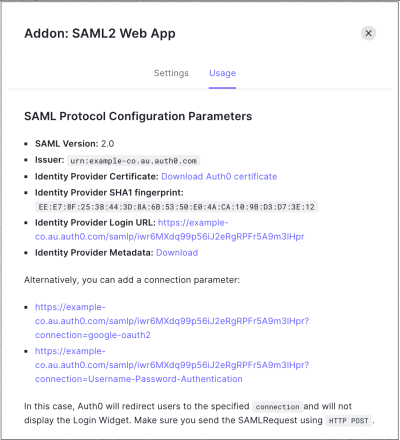
On the Usage tab, locate Identity Provider Metadata and click Download to download the metadata file. You will need this when you configure Auth0 as the identity provider.
Configure SAML SSO on GitHub
- Follow the instructions in GitHub for Enabling and testing SAML Single Sign-on (SSO) for your organization to complete the configuration on GitHub Enterprise Cloud.
- You will need the following information:
| Field | Entry |
|---|---|
| Sign On URL | https://{yourDomain}/samlp/{CLIENT_ID}will be the client_id for the GitHub application you just created in Auth0. |
| Issuer | urn:auth0:{yourTenant} |
| Public Certificate | Download it from https://{yourDomain}/pem. Open the downloaded file with a text editor, copy the contents and paste it in the text area on GitHub. |
| Signature method | RSA256-SHA256 |
| Digest method | SHA256 |
- As recommended in GitHub’s documentation, before enabling SAML SSO for your organization, click Test SAML configuration to ensure that the information you’ve entered is correct.