By Steve Hobbs
This tutorial demonstrates how to add user login to a Javascript application using Auth0.We recommend that you log in to follow this quickstart with examples configured for your account.New to Auth? Learn How Auth0 works, how it integrates with Single-Page Applications and which protocol it uses.
Configure Auth0
Get Your Application Keys
When you signed up for Auth0, a new application was created for you, or you could have created a new one. You will need some details about that application to communicate with Auth0. You can get these details from the Application Settings section in the Auth0 dashboard.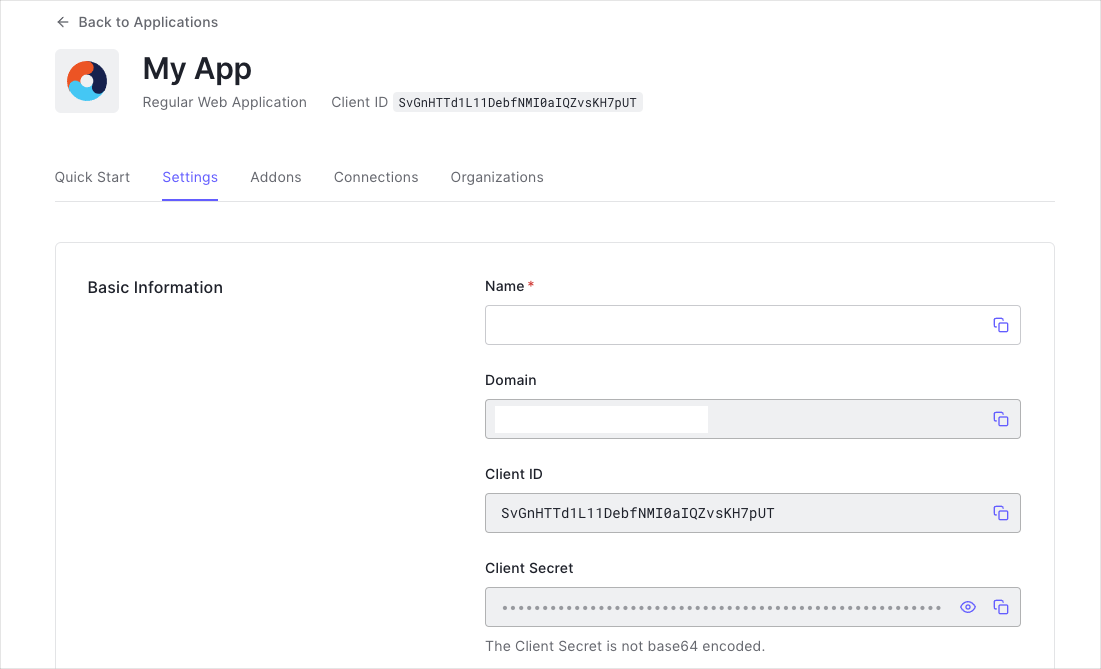
When using the Default App with a Native or Single Page Application, ensure to update the Token Endpoint Authentication Method to
None and set the Application Type to either SPA or Native.- Domain
- Client ID
If you download the sample from the top of this page, these details are filled out for you.
Configure Callback URLs
A callback URL is a URL in your application where Auth0 redirects the user after they have authenticated. The callback URL for your app must be added to the Allowed Callback URLs field in your Application Settings. If this field is not set, users will be unable to log in to the application and will get an error.If you are following along with the sample project you downloaded from the top of this page, you should set the Allowed Callback URL to
http://localhost:3000.Configure Logout URLs
A logout URL is a URL in your application that Auth0 can return to after the user has been logged out of the authorization server. This is specified in thereturnTo query parameter. The logout URL for your app must be added to the Allowed Logout URLs field in your Application Settings. If this field is not set, users will be unable to log out from the application and will get an error.
If you are following along with the sample project you downloaded from the top of this page, the logout URL you need to add to the Allowed Logout URLs field is
http://localhost:3000.Configure Allowed Web Origins
You need to add the URL for your app to the Allowed Web Origins field in your Application Settings. If you don’t register your application URL here, the application will be unable to silently refresh the authentication tokens and your users will be logged out the next time they visit the application, or refresh the page.If you are following along with the sample project you downloaded from the top of this page, you should set the Allowed Web Origins to
http://localhost:3000.Integrate Auth0 in your Application
Use the Auth0 SPA SDK library to integrate Auth0 into your application. You can either install the library as a dependency in your application, or load it from CDN.Install as a dependency
You can install the Auth0 SPA SDK as a dependency of your application, useful if you’re using a build system such as Webpack. You can do this usingnpm or yarn.
Reference the CDN
Alternatively, if you do not use a package manager such as Webpack, you can retrieve the Auth0 SPA SDK from Auth0’s CDN.If you encounter some problems or errors when using the new JavaScript SDK, please check out the FAQ to see if your issue is covered there.
Authentication with Auth0
Universal Login is the easiest way to set up authentication in your application. We recommend using it for the best experience, best security and the fullest array of features. This guide will use it to provide a way for your users to log in to your JavaScript application.You can also embed the login dialog directly in your application using the Lock widget. If you use this method, some features, such as single sign-on, will not be accessible.
access_token: to learn more, see the Access Token documentationid_token: to learn more, see the ID Token documentationexpires_in: the number of seconds before the Access Token expires
Setting Up the Application
Create a basic HTML page
Create a folder on your machine to house the application, then add anindex.html file to the root of the project. This HTML page will display a welcome message and have a “gated” section which requires the user to be authenticated before accessing. You can copy/paste the following content into the file. You will be adding more lines as you progress with this article.
Add the following content to the index.html file you just created:
public, a folder inside that called css and a new file in there called main.css. This will be used to define how the gated content elements will be hidden in the page.
Open the newly-created public/css/main.css file and add the following CSS:
public folder called js, and a new file in there called app.js. This will house the application-specific logic that you will create over the next few sections.
The folder structure so far should look like the following:
Reference the SDK
This article is based on the new SPA SDK available here. You can reference the package from the CDN in theindex.html file by placing the script tags at the very bottom of the body tag:
Configure credentials
Create anauth_config.json in the root of the project. The values from domain and clientId should be populated from your Auth0 application settings as configured above.
As
auth_config.json is served publicly, this file should never contain sensitive information such as passwords and client secrets.Create the server
In this section you will create a basic web server using ExpressJS. This will be used to serve our HTML page, along with any assets that it requires (JavaScript, CSS, etc). Run the following command in the same folder as theindex.html file you created earlier:
Installing dependencies
In the terminal, install the dependencies that are necessary to get the server up and running:nodemon so that our server can be restarted on any code changes:
package.json file and modify the “scripts” entry to look like the following:
npm startwill run the application as normalnpm run devwill run the application usingnodemon, watching for changes as we modify files
Creating server.js
Next, create a new file in the root of the project alongsideindex.html and package.json, called server.js. This will be our backend server and will be used to serve the SPA pages.
Populate server.js with the following code:
- one which serves the authentication configuration file to the client-side app
- another which serves every other request to the
index.htmlfile, which will provide support for any client-side routing as all routes go to the same page
.js and .css files from the /public folder.
Initialize the SDK
The SDK must be properly initialized with the information of the Auth0 application created above. To start, open thepublic/js/app.js file and add a variable to hold the Auth0 client object:
auth_config.json file. This can be done by calling the endpoint on the server that was created in the previous section. To do this, create a new function called fetchAuthConfig further down the app.js file, which can be used to download this information:
configureClient. This will use fetchAuthConfig to download the configuration file and initialize the auth0Client variable:
window.onload function that will then make this call to initialize the application:
CMD+SHIFT+R keys on OSX and CTRL+SHIFT+R keys on Windows.
Restoring Login State with Social Providers
Users who are logged in with username/password will be silently reauthenticated automatically when the application reloads. No further action is needed for this type of login. If you are using the classic Universal Login experience and would like users to authenticate using social identity providers (such as Google, Apple, Facebook, etc.), then you will need to configure those connections in your Auth0 Dashboard. In the navigation menu, choose Connections - Social, and select the social connection you’d like to support. In the connection’s settings, click “How to obtain a Client ID?“ and follow the instructions to set up your own ID and secret. If you are using the new Universal Login experience, the default enabled social connections will silently reauthenticate without additional configuration. However, you should still set up your own keys and avoid using default Auth0 development keys in a production app.Evaluate the authentication state
As a first approach, you want to make sure anyone is able to visit the public page but not the page that is meant for authenticated users only, such as a settings panel or the user profile details. You can decide which content is available by hiding, disabling, or removing it if no user is currently logged in. You do so by checking the result of calling theauth0Client.isAuthenticated() method. Use this to enable or disable the Log in and Log out buttons, which are disabled by default. This can be part of a new updateUI() function called from the window.onload method right after the initialization.
Still inside the app.js file, add a new function called updateUI and modify the onload handler to call this new function:
Checkpoint: If you run the project again, you should see that the “Log in” button is shown as enabled as no user has previously logged in. But clicking it will not do anything as there is no logic associated to that action yet.
Log In to the Application
Authentication is achieved through a redirect to the Auth0 Universal Login Page. Once the user signs up or logs in, the result will be passed to your app’s redirect URI, which is provided with the authorization request. Inside theapp.js file, provide a login function that calls auth0Client.loginWithRedirect() to perform the login step. The login function is called by the Log in button previously defined in the HTML page. In this sample, you will redirect the user back to the same page they are now. You can obtain that value from window.location.origin property:
- The user does not want to authenticate and is just navigating through public content or
- The user has recently initiated the authentication process and is now looking to complete it.
window.onload method, check whether the user is authenticated or not, and if the URL query contains both a code and state parameter. This will indicate that an authentication result is present and needs to be parsed. In that scenario, you do so by calling the auth0Client.handleRedirectCallback() method. This will attempt to exchange the result that the Auth0 backend gave you back for real tokens you can use.
In addition, the query parameters must be removed from the URL so that if the user refreshes the page, the app does not try to parse the state and code parameters again. This is achieved with the window.history.replaceState method.
Modify the window.onload function inside app.js to include these changes:
If you see any errors from the Auth0 server, check that you have not forgotten to register the callback URL or the allowed origins as explained initially.
Log the User Out
You may have noticed that the Log out button is clickable when the user is authenticated, but does nothing. You need to add the code that will log the user out from the Auth0 backend. Start the log out by calling theauth0Client.logout() method passing a valid return-to URI. In this sample you will return the user back to the same page they are now. You can obtain that value from window.location.origin property. Abstract this logic into a logout() method.
Checkpoint: Being authenticated click the Log out button. You should be taken to the Universal Login Page configured for your application and then back to the page you were before. Now the authentication cookies were cleared and the user is logged out. The “Log in” button will be enabled back again.
Read the User Profile
Every time a user is logged in you get access both to the access token and the ID token. The user’s profile information is then extracted from the ID token. Typically, the token is used to call your backend application and the profile information is used to display their name and profile picture. In this section you are going to display them in separate text areas so you can easily inspect them. Open theindex.html file and insert the following lines at the bottom of the body.
app.js file and modify the updateUI() function declared previously. Add the logic such that when the user is logged in the gated content is shown. Use the existing variables and functions from the SDK client to obtain and display this information on the page.
In addition, at the start of this article you added a public/css/main.css file with the definition of the hidden class, which can be used to easily hide elements on the page. Using the authenticated flag as shown below, add or remove this class to the elements you want to show or hide in the updateUI() function:
Checkpoint: Go ahead and run the project for the last time. Now if the user is authenticated you will get to see their access token and profile data. See how this content disappears when you log out.